How does edible printing work?
Share
How Does Edible Printing Work? The Sweet Science Behind Picture-Perfect Cakes
Picture this: a cake so stunning you hesitate to cut it—until you learn that jaw-dropping image on top is 100% edible. Over 70% of custom cakes now boast edible prints, turning plain desserts into personal works of art. How does a machine usually spitting out spreadsheets end up creating something you can eat? Let’s peel back the layers of edible printing and uncover the tech that’s making bakers’ lives sweeter.
What Is Edible Printing?
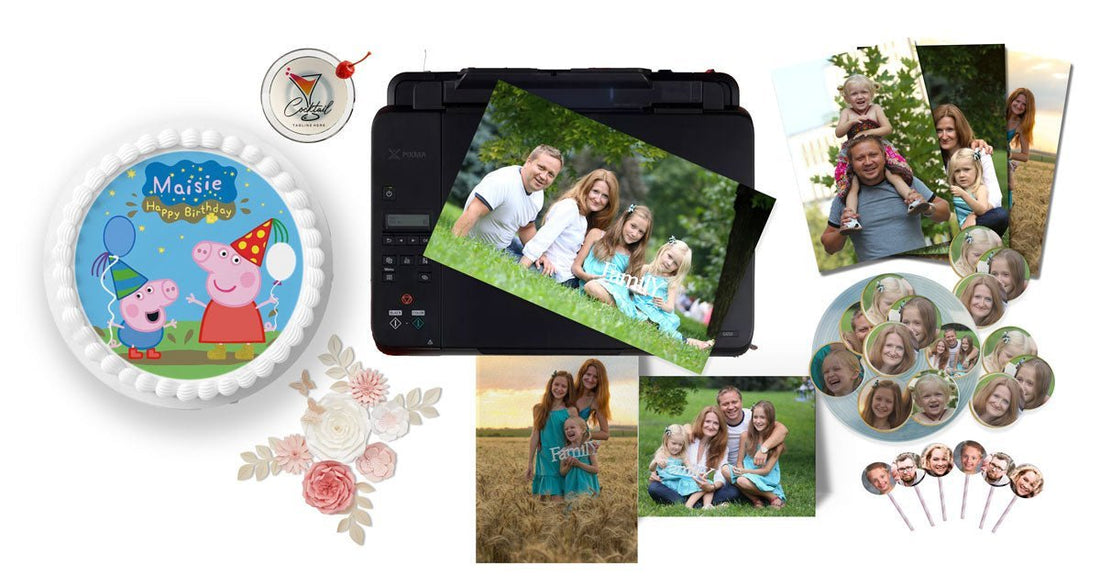
Edible printing brings cake decorating into the modern age. It’s a process where specialized printers use food-safe inks to print designs onto edible sheets. Think cakes, cookies, or cupcakes topped with everything from family photos to company logos—all safe to eat.
The setup is simple. You load a printer with edible ink—stuff made from food-grade ingredients—and it prints onto sheets crafted from sugar, starch, or even chocolate. I’ve seen a kid’s birthday cake with a printed superhero leap off the table. Guests didn’t just admire it—they devoured it.
Can a Regular Printer Be Used for Edible Printing?
Not a chance. Your everyday printer, great for resumes, flops with edible sheets. Edible printing calls for printers built to handle thicker materials like frosting sheets, wafer paper, or chocolate transfer sheets. Regular printers are tuned for standard paper. Feed them an edible sheet, and you’ll likely get a jam—or a blurry mess if you’re lucky. Trust me, I’ve tried coaxing my old HP into this gig. It didn’t end well. Stick to printers designed for the job.
Can You Turn Any Printer Into an Edible Printer?
Nope, it’s not a free-for-all. Only specific brands—Canon and Epson—play nice with food-safe, refillable edible ink cartridges. Here’s the scoop:
- Canon: These shine because you can pop out the printhead to clean or swap it. Keeps things tidy and simple.
- Epson: No removable printhead here. Cleaning’s a chore—think ink-stained hands and muttered curses.
I lean toward Canon for its no-fuss upkeep. If you’re picking a printer, match it to your patience level for maintenance. Either way, it’s these two or bust.
How Is Edible Printing Done?
The process is slick yet approachable. Edible paper—often rice or potato starch-based—slides into a printer loaded with edible ink. The printer lays down your design in CMYK colors (cyan, magenta, yellow, black), just like it would for a photo. Apply that printed sheet to a moist surface, like fresh frosting, and it melts a bit, fusing the image into the cake. The resolution stays sharp. You’d swear the picture was printed right onto the icing.
Ever wonder how bakers nail those lifelike portraits? This is their secret weapon.
How Long Do Edible Images Last Once Printed?
Edible images hold up well if you treat them right. Seal them in an airtight bag, keep them out of sunlight and dampness, and they’re good for up to six months. But here’s the real talk: use them within a few days of printing for peak vibrancy and texture. I’ve seen prints fade after weeks on a shelf. Fresh is best—don’t let that perfect image go dull.
What Do You Need to Print Edible Images?
Ready to jump in? Here’s what you’ll need:
- A compatible printer (Canon or Epson)
- Edible ink cartridges (CMYK set)
- Edible sheets (frosting, wafer, or chocolate transfer)
- Design software (e.g., Photoshop, Canva)
- A dessert to decorate (cake, cookies, etc.)
I start with frosting sheets for their smooth finish. Experiment to find your favorite.
How Do You Transfer Edible Images to a Cake?
This is where the magic lands. Follow these steps to stick your edible image like a pro:
- Prep the Cake: Get the frosting tacky—not sopping wet, not bone dry. Too moist, and colors bleed. Too dry, and it won’t stick.
- Handle Gently: Grab the topper by the edges. Fingerprints on the print? Nope, keep it pristine.
- Place It Down: Start in the middle, then smooth outward with your palm. Slow and steady wins.
- Fix Flaws: Bubbles or wrinkles? Pat them out with dry fingers. Water’s a no-go—colors will run faster than a kid after ice cream.
I botched my first try with a soggy cake. The image turned into a tie-dye mess. Lesson learned: balance is everything.
Why Bother With Edible Printing?
So, why go through the trouble? Here’s the payoff:
- Speed: Forget hours of piping. Print a design in minutes and call it done.
- Personal Touch: Photos, logos, doodles—whatever you want, it’s yours. Perfect for birthdays or that big client meeting.
- Pro Vibes: Even amateurs can churn out cakes that look bakery-fresh. Impress without the sweat.
I whipped up a cake with my niece’s face on it for her party. The gasps—and grins—were worth every second.
What Trips People Up?
Edible printing’s not rocket science, but missteps happen. Watch out for these:
- Wrong Printer: Don’t force your office clunker into service. Canon or Epson only.
- Bad Storage: Airtight, dry, dark—that’s the mantra. Sloppy storage kills quality.
- Wet Cakes: Too much moisture turns your masterpiece into a runny blob. Keep it tacky, not drenched.
I learned the wet-cake lesson the hard way. Spare yourself the cleanup.
Where Can You Take Edible Printing?
Think beyond cakes. Cookies with team logos for a sports bash. Cupcakes with tiny thank-you notes for a wedding. Or chocolate bars with a printed message for a gift. The limit’s your imagination. What would you print first?
Edible printing marries tech and taste in a way that’s hard to beat. With the right gear, a little know-how, and some care, you can churn out desserts that stun and satisfy. Grab a printer, some ink, and an idea—your next cake could be the talk of the table. What’s stopping you? Dive in and see where it takes you.